
DIY COFFEE SCRUB
This first idea is for that person who is into skincare or pampering themselves. This DIY gift idea is perfect for them!

What you'll need:
1/2 cup coffee grounds
2 tbs cocoa powder (not hot chocolate mix!)
1/2 cup raw sugar (or brown sugar)
1 tbs cinnamon
1/4 cup coconut oil
1 spoon
1 bowl for mixing ingredients
1 jar
ribbon
Quick side note: why these ingredients? Coconut oil has proteins that help hydrate and rejuvenate the skin. Cocoa powder is packed with antioxidants that help to repair your skin cells and nuetralize harmful free radicals. Not to mention, it smell delicious. Raw sugar is the main ingredient for all over exfoliation. The coffee grounds contain caffeine that stimulates the blood that helps to circulate the fatty flow under your skin to help reduce the look of cellulite. Cinnamon brings blood & nutrients to the skin to help relieve dry skin. With repeated use overtime, you will see a decrease in the appearance of cellulite and your skin will be softer and radiant.
1.) Start with a clean and dry bowl. Add in all of your dry ingredients first. Mix well with a spoon.

2.) Now you're gonna add in your coconut oil. This is where it might get a little tricky but just take your time and eventually it will look like this.

Once it is combined, DO NOT continue to mix it. You don't want the sugar to dissolve. You just want everything to be combined.
3.) Remove it from the bowl and add it into your clean and dry jar. Decorate your jar with a cute ribbon or maybe a bow. You're all finished!

DIY HOT COCOA JAR
Who doesn't like hot cocoa? Surprise someone with this sweet gift.

What you'll need:
1 mason jar (or clear container of your choice)
1 ribbon or bow
2 hot chocolate packets
small marshmallows
candy canes
1 Hershey's chocolate bar
1.) This one is unbelievably cute! Start off with your mason jar. Make sure it's clean and dry! Add in your hot chocolate mix. I like to tap the jar lightly on the table so that the mix is even and flat.

2.) Add in your marshmallows. Add as little or as much as you like.

3.) You're gonna add in the Hershey's chocolate bar next. I wanted it in chunks so I cut up the bar in pieces. You can definitely use chocolate chips instead if you're making multiple jars but I'm only making one and I'm going cheap here. Bag of chocolate chips? $3-$4. One chocolate bar? $1. Besides, I like the chunky look.
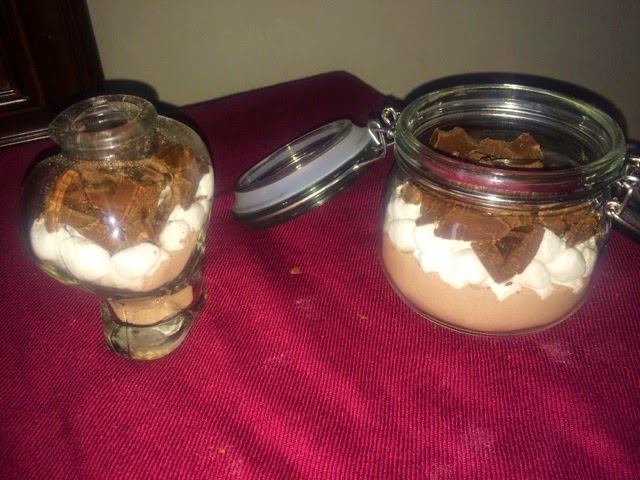
4.) Last but not least, add the candy cane pieces on top. For this step, I just crushed the candy canes in their packaging with a spoon until it was the size of my liking. If you buy full-sized candy canes, just put one or two in a ziploc bag and crush them that way.

Just finish it off with a ribbon or bow and voila! Your gift is ready to be given.

DIY BEANIE
The winter season is upon us and baby, it's cold outside. Make your friend a beanie and help them stay warm all season long.
What you'll need:
fabric of your choice
scissors
marker or chalk
needle and thread (or fabric glue & glue gun)
The cheapest way to go about getting fabric for this is to look through your closet for old sweaters or my favorite, thrifting! Look for a small to medium sized sweater in the color/design of your liking.
1.) I liked how large the neck was on this turtleneck sweater and the material was perfect beanie material so I chose to cut that off and use that for the beanie.


2.) Cut the fabric open by cutting right up the edge of the fabric and wrap the bottom of the material around your head to fit it to size. Mark it. Leave about 1/2 inch of space from the marked line and cut the excess material off.

3.) Now lay the fabric down flat and fold it into thirds and turn it upside down. You're going to cut a "U" shape on the cut edge. Really take your time to shape out a nice "U" shape.

4.) Now sew or glue the sides of the beanie together. You're just going to be left with the top pieces. Ok, so to make this simple, I've labeled these three top pieces as A, B & C & colored the sides that should be sewn/glued together. Take the side edge of A and sew or glue it to B on the side directly next to it. Then take the other side of B and sew or glue it to C on the side closest to it. Then sew or glue the other side of C to the remaining side of A.

When you're done, it should look like this.

5.) Flip the beanie outside-in and you're done!

I hope you guys enjoyed these little DIY gift ideas! Have a wonderful holiday!
From me to you,
Xx Melissa.
No comments:
Post a Comment